https://www.jb51.net/article/133868.htm
这次给大家带来Angular2 父子组件通信方式,使用Angular2 父子组件通信方式的有哪些,下面就是实战案例,一起来看一下。
Angular2官方文档对组件交互这块有详细的介绍-->文档--组件之间的交互。按文档介绍,组件间交互的方式一共有4种,包括:
-
通过输入型绑定把数据从父组件传到子组件(@Input decoration);子组件暴露一个EventEmitter属性(@Output decoration),当事件发生时,利用该属性emits向父组件发射事件。
-
父组件与子组件通过本地变量互动。(# var)
-
父组件调用@ViewChild。
-
父组件和子组件通过服务来通讯。
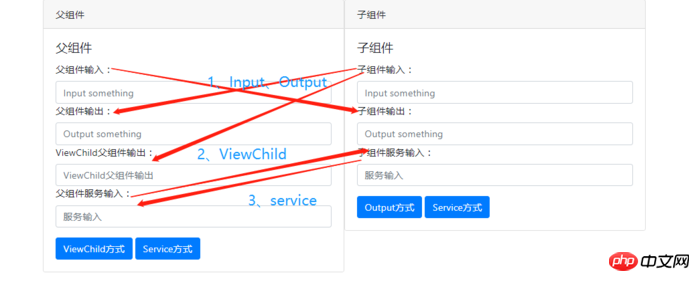
我在这里只总结、详细介绍3种我在项目中使用过的方法,看完本文大概能做到如下的效果:
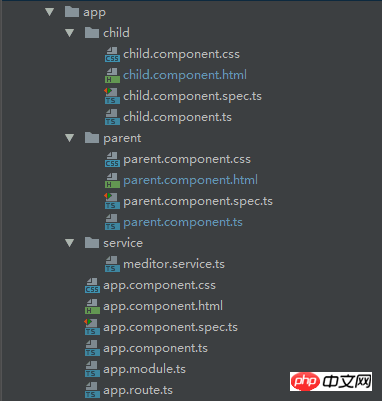
创建项目,项目结构如下:
通过@Input、@Output装饰器进行父、子组件间的通信
@Input:该属性绑定用于父组件向子组件传递数据。子组件可以通过以下两种方法截取属性的变更:
-
使用一个输入属性的setter,以拦截父组件中值得变化。
-
通过ngOnchanges()来截听输入属性值的变化。
@Output:该用于子组件向父组件传递数据和事件。
| 1 2 3 4 5 6 7 8 9 10 11 12 13 14 15 16 17 18 19 20 21 22 23 24 25 26 27 28 29 30 31 | <!--parent.component.html-->
<p style="width: 1000px;margin: auto">
<p class="card" style="width: 500px;float: left">
<p class="card-header">
父组件
</p>
<p class="card-body">
<h5 class="card-title">父组件</h5>
<p class="form-group">
<label for="input">父组件输入:</label>
<input type="text"
class="form-control"
id="input"
placeholder="Input something"
[(ngModel)]="parentPrint"
>
<label for="output">父组件输出:</label>
<input type="text"
class="form-control"
id="output"
placeholder="Output something"
[(ngModel)]="contentFromChild"
>
</p>
</p>
</p>
<app-child
[fromParent]="parentPrint"
(fromChild)="fromChild($event)"
></app-child>
</p>
|
| 1 2 3 4 5 6 7 8 9 10 11 12 13 14 15 16 17 18 19 20 21 22 23 24 25 26 | <!--child.component.html-->
<p class="card" style="width: 500px;">
<p class="card-header">
子组件
</p>
<p class="card-body">
<h5 class="card-title">子组件</h5>
<p class="form-group">
<label for="input">子组件输入:</label>
<input type="text"
class="form-control"
id="input"
placeholder="Input something"
[(ngModel)]="contentFromChild"
>
<label for="output">子组件输出:</label>
<input type="text"
class="form-control"
id="output"
placeholder="Output something"
[(ngModel)]="fromParent"
>
</p>
<button class="btn btn-primary" (click)="clickChild()">Output方式</button>
</p>
</p>
|
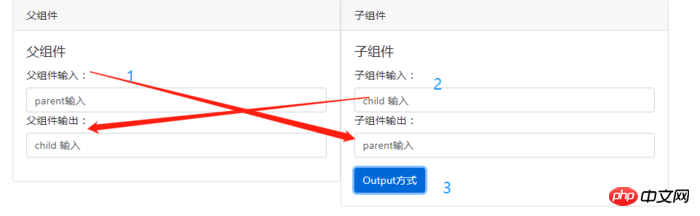
效果如下:(1、父组件输入,子组件可同步输出;2、子组件输入需要(3、)点击按钮触发发射事件,将数据传送给父组件。)
@Input:父组件输入的同时,子组件能同步获取数据进行显示。核心代码如下:
| 1 2 3 4 5 6 7 8 | parentPrint: any;
[(ngModel)]="parentPrint"
<app-child [fromParent]="parentPrint"></app-child>
@Input() fromParent;
[(ngModel)]="fromParent"
|
通过setter截听输入属性值的变化,在子组件中声明一个私有变量来获取父组件传递过来的数据,从而屏蔽上层获取下层信息。(简单一点就是不让父组件知道子组件用什么东西去接收传过来的数据)通过这种方法也可以获得同样的效果。
| 1 2 3 4 5 6 7 8 9 | private _fromParent: any;
@Input()
set fromParent(fromParent: any) {
this._fromParent = fromParent;
}
get fromParent(): any {
return this._fromParent;
}
|
@Output:父组件接收子组件的数据时,子组件暴露一个EventEmitter属性,当事件发生时,子组件利用该属性emits(向上弹射)事件。父组件绑定到这个事件属性,并在事件发生时作出回应。核心代码如下:
| 1 2 3 4 5 6 7 8 | @Output() fromChild = new EventEmitter<any>();
<button class="btn btn-primary" (click)="clickChild()">Output方式</button>
clickChild() {
console.log('click child' , this.contentFromChild);
this.fromChild.emit(this.contentFromChild);
}
|
| 1 2 3 4 5 6 7 8 9 10 11 12 | [(ngModel)]="contentFromChild"
<app-child
[fromParent]="parentPrint"
(fromChild)="fromChild($event)"
></app-child>
fromChild(event) {
console.log(event);
this.contentFromChild = event;
}
|
父组件通过调用@ViewChild()来获取子组件的数据
如果父组件的类需要读取子组件的属性和值或调用子组件的方法时,就可以把子组件作为ViewChild,注入到父组件里面。ViewChild顾名思义就是可以看见子组件里面的。
| 1 2 3 4 5 6 7 8 9 10 11 12 13 14 15 16 17 18 19 20 21 22 | <!--parent.component.html-->
<p style="width: 1000px;margin: auto">
<p class="card" style="width: 500px;float: left">
<p class="card-header">
父组件
</p>
<p class="card-body">
<h5 class="card-title">父组件</h5>
<p class="form-group">
<label for="viewoutput">ViewChild父组件输出:</label>
<input type="text"
class="form-control"
id="viewoutput"
placeholder="ViewChild父组件输出"
[(ngModel)]="viewOutput"
>
</p>
<button class="btn btn-primary" (click)="clickView()">ViewChild方式</button>
</p>
</p>
<app-child></app-child>
</p>
|
| 1 2 3 4 5 6 7 8 9 10 11 12 13 14 15 16 17 18 | <!--child.component.html-->
<p class="card" style="width: 500px;">
<p class="card-header">
子组件
</p>
<p class="card-body">
<h5 class="card-title">子组件</h5>
<p class="form-group">
<label for="input">子组件输入:</label>
<input type="text"
class="form-control"
id="input"
placeholder="Input something"
[(ngModel)]="contentFromChild"
>
</p>
</p>
</p>
|
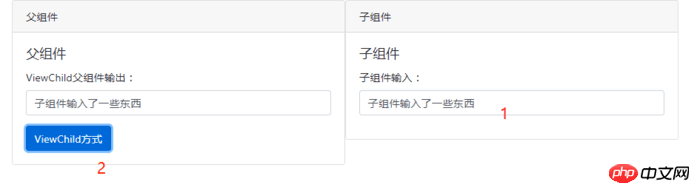
效果如下:
父组件核心代码:
| 1 2 3 4 5 6 7 8 | @ViewChild(ChildComponent)
private childComponent: ChildComponent;
clickView() {
this.viewOutput = this.childComponent.contentFromChild;
}
|
| 1 2 3 | [(ngModel)]="viewOutput"
<button class="btn btn-primary" (click)="clickView()">ViewChild方式</button>
|
父组件和子组件通过服务来通讯
父组件和它的子组件共享同一个服务,利用该服务在家庭内部实现双向通讯。
| 1 2 3 4 5 6 7 8 9 10 11 12 13 14 15 16 17 18 19 20 21 22 | <!--parent.component.html-->
<p style="width: 1000px;margin: auto">
<p class="card" style="width: 500px;float: left">
<p class="card-header">
父组件
</p>
<p class="card-body">
<h5 class="card-title">父组件</h5>
<p class="form-group">
<label for="serviceoutput">父组件服务输入:</label>
<input type="text"
class="form-control"
id="serviceoutput"
placeholder="服务输入"
[(ngModel)]="serviceInput"
>
</p>
<button class="btn btn-primary" (click)="clickService()">Service方式</button>
</p>
</p>
<app-child></app-child>
</p>
|
| 1 2 3 4 5 6 7 8 9 10 11 12 13 14 15 16 17 18 19 | <!--child.component.html-->
<p class="card" style="width: 500px;">
<p class="card-header">
子组件
</p>
<p class="card-body">
<h5 class="card-title">子组件</h5>
<p class="form-group">
<label for="serviceoutput">子组件服务输入:</label>
<input type="text"
class="form-control"
id="serviceoutput"
placeholder="服务输入"
[(ngModel)]="serviceInput"
>
</p>
<button class="btn btn-primary" (click)="clickService()">Service方式</button>
</p>
</p>
|
| 1 2 3 4 5 6 7 8 9 10 11 12 13 14 15 16 17 18 19 20 21 22 23 | import {Injectable} from '@angular/core';
import {Subject} from 'rxjs/Subject';
import {Observable} from 'rxjs/Observable';
@Injectable()
export class MeditorService {
private subject = new Subject<MeditorMsg>();
constructor() {}
public getObservable(): Observable<MeditorMsg> {
return this.subject.asObservable();
}
public push(msg: MeditorMsg) {
this.subject.next(msg);
}
}
export interface MeditorMsg {
id: string;
body: any;
}
|
效果如下:
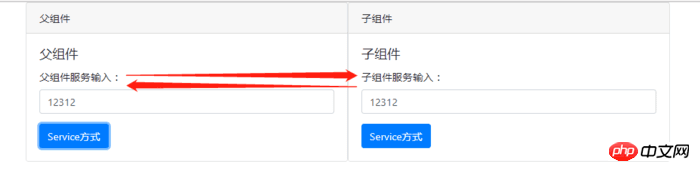
父子组件的核心代码类似,在中将该服务实例注入到自身,父子组件都有一个唯一的id。无论是父组件还是子组件调用push()方法推送数据,双方都能接收到数据,这时候就要根据id来判断是要父组件使用数据还是子组件使用数据。核心代码如下:
| 1 2 3 4 5 6 7 8 9 10 11 12 13 14 15 16 17 18 19 20 21 22 23 24 25 26 27 28 29 30 31 32 33 34 35 | subscription: Subscription = null;
constructor(
private meditor: MeditorService
) {
this.subscription = meditor.getObservable().subscribe(
msg => {
console.log(msg);
if (msg.id === 'parent') {
this.serviceInput = msg.body;
}
}
);
}
clickService() {
this.meditor.push({id: 'parent', body: this.serviceInput});
}
constructor(
private meditor: MeditorService
) {
this.subscription = meditor.getObservable().subscribe(
msg => {
console.log(msg);
if (msg.id === 'child') {
this.serviceInput = msg.body;
}
}
);
}
clickService() {
this.meditor.push({id: 'parent', body: this.serviceInput});
}
|
我上面写的还不是很完善,就是在结束前,也就是在onDestroy周期中,要取消订阅。
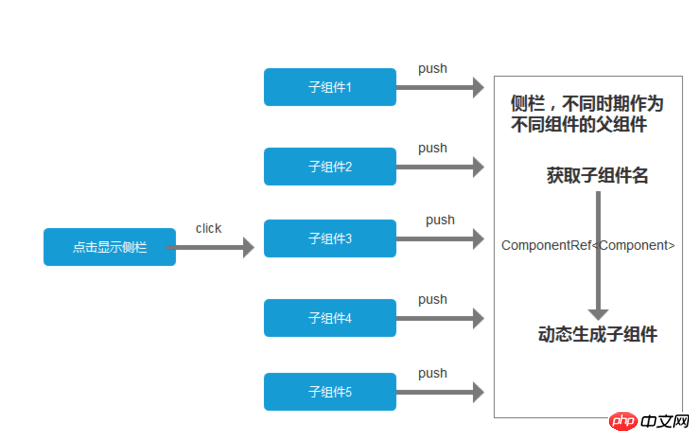
以上,就是最近在使用的组件交互的总结。个人觉得通过服务来交互的可扩展性更强。例如,我们项目中用到了一个动态显示的侧栏,不同时期点击显示侧栏要显示不同的东西。这个时候把侧栏作为父组件,子组件作为消息的一部分传递给父组件,父组件根据子组件名动态生成模板,显示在侧栏上面。说了这么多废话大概就是下图的意思:
最后附上demo源码:
以上就是本文的全部内容,希望对大家的学习有所帮助,也希望大家多多支持脚本之家。